
Creating a DIY dog agility course can be an exciting and rewarding project for both you and your furry friend. Dog agility training is not only about physical exercise; it’s also about mental stimulation and strengthening the bond between you and your dog. As dog owners, we often seek ways to keep our pets healthy, engaged, and happy. A homemade agility course provides a fantastic opportunity to achieve all of this while also having fun.
Understanding Dog Agility
What is Dog Agility?
Dog agility is a fast-paced sport where dogs navigate through a series of obstacles, guided by their handlers. Originating in the United Kingdom in the late 1970s, agility was initially created as a form of entertainment for spectators at dog shows. It has since evolved into a competitive sport with various levels of competition, from local trials to international championships.
Benefits of Dog Agility Training
Engaging your dog in agility training offers numerous benefits:
- Physical Health: Agility courses provide an excellent workout, improving your dog’s strength, agility, and overall fitness.
- Mental Stimulation: The challenges presented by agility obstacles engage your dog’s mind, helping to reduce boredom and destructive behaviors.
- Bonding Experience: Working together on an agility course strengthens the relationship between you and your dog, enhancing trust and communication.
Planning Your DIY Agility Course
Assessing Your Space
Before you start building your DIY dog agility course, you need to assess your available space. Ideal locations for agility courses include:
- Backyards: A spacious backyard is perfect, allowing for a variety of obstacles and room to run.
- Parks: If you don’t have a backyard, consider using a local park (with permission) to set up your course.
When measuring your space, consider the layout and flow of the course. You’ll want enough room for your dog to gain speed and maneuver through the obstacles.
Choosing the Right Equipment
A variety of equipment is used in dog agility training, including jumps, tunnels, and weave poles. Here’s a quick overview:
- Jumps: Simple barriers that your dog must jump over.
- Tunnels: Tubes that dogs run through.
- Weave Poles: A series of vertical poles that dogs weave between.
When considering equipment, weigh the pros and cons of DIY vs purchased options. DIY equipment can be customized to fit your space and often saves money, while purchased equipment may offer more durability and professional design.
Safety Considerations
Safety is paramount when creating your agility course. Here are some tips to ensure a safe training environment:
- Ensure the ground is level and free of debris.
- Use soft materials for jumps and other obstacles to prevent injuries.
- Supervise your dog during training to prevent accidents.
DIY Equipment Ideas
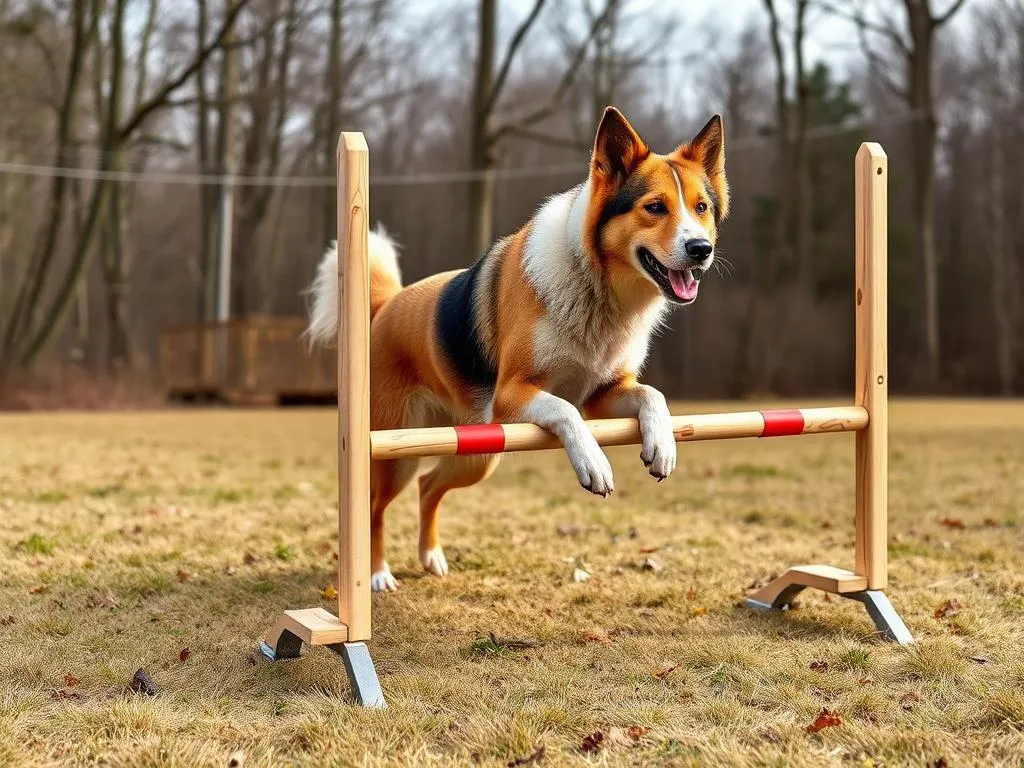
Jump Obstacles
Creating jump obstacles is one of the simplest projects for your DIY dog agility course. Here are the materials you’ll need:
- PVC Pipes: Lightweight and easy to work with.
- Wood: For a more permanent structure.
Step-by-Step Instructions for Building Jump Obstacles
- Materials Needed:
- 2 PVC pipes (for the jump bars)
- 4 PVC pipes (for the vertical stands)
- Connectors
-
A saw (if cutting is necessary)
-
Construction:
- Cut the vertical pipes to your desired height (typically 24–36 inches for small to medium dogs).
- Assemble the stands using connectors.
- Attach the horizontal jump bars at adjustable heights.
Tunnels
Tunnels can add excitement to your course. There are two main types: collapsed and rigid.
DIY Tunnel Construction Tips
- Use a children’s play tunnel or create a tunnel using PVC or fabric.
- For a simple fabric tunnel, sew a long piece of durable material into a tube shape and secure the ends.
Weave Poles
Weave poles are essential for any agility course.
Instructions for Making Weave Poles
- Materials Needed:
- 6–12 PVC pipes (about 5–6 feet long)
-
A drill (to create holes for securing)
-
Construction:
- Mark a straight line in the ground where you want your weave poles.
- Space the poles about 24 inches apart, ensuring they are secured in the ground.
Contact Equipment
Contact obstacles like the A-frame and dog walk are key components of agility courses.
DIY Options for Building Contact Equipment
- A-frame: Use plywood or sturdy wood to create two ramps with a peak in the middle.
- Dog walk: Construct a flat plank elevated above the ground, supported by sturdy legs.
Designing Your Course Layout
Basic Course Layout Principles
When designing your DIY dog agility course, consider the following principles:
- Flow: The sequence of obstacles should allow for smooth transitions.
- Variety: Include a mix of jumps, tunnels, and weave poles to keep your dog engaged.
Sample Course Layouts
Here are some example layouts for different skill levels:
- Beginner Layout: Start with simple jumps, a short tunnel, and two weave poles.
- Intermediate Layout: Add more jumps, an A-frame, and four weave poles.
- Advanced Layout: Incorporate a full range of equipment, including a dog walk and multiple tunnels.
Visual aids such as diagrams can help you better understand how to arrange your obstacles.
Training Techniques and Tips
Getting Started with Training
Before diving into agility training, it’s crucial to teach your dog basic commands such as “sit,” “stay,” and “come.”
Introducing Your Dog to Agility Equipment
- Begin with one obstacle at a time.
- Use treats and positive reinforcement to encourage your dog to approach and engage with the equipment.
Building Confidence and Skills
Gradually increase the difficulty of the obstacles as your dog becomes more comfortable:
- Start with lower jumps and work up to higher ones.
- Keep sessions short and fun to maintain your dog’s interest.
Common Training Challenges
Many dogs may show hesitation or fear when first encountering agility equipment. Here are some tips to help:
- Desensitize: Allow your dog to explore the equipment without pressure.
- Positive Reinforcement: Use treats and praise to reward your dog for overcoming fears and trying new obstacles.
Maintaining Your Agility Course
Routine Maintenance Tips
Regular maintenance ensures your course remains safe and functional:
- Inspect equipment for damage or wear.
- Clean off debris and ensure the ground is even.
Updating and Expanding Your Course
As your dog progresses, consider adding new obstacles to keep training fresh and exciting:
- Introduce new challenges like different jump heights or additional weave poles.
- Rotate equipment placement to create a new course layout.
Conclusion
Creating a DIY dog agility course is not only a fun project but also a fantastic way to enhance your dog’s physical and mental well-being. With careful planning, safety considerations, and creativity, you can build a course that both you and your dog will enjoy. So gather your materials, design your layout, and start training! Share your experiences and course designs in the comments to inspire others in their agility journey.
Related posts:
 How To Train Dalmatians
 Should I Train My Dog Myself Or Hire A Dog Trainer
 How To Stop A Dog From Pulling While Walking
 How To Train Your Dog For Hiking
 Best Dog Training Apps
 How To Get A Dog To Poop In Snow
 How To Train A Fearful Dog
 How To Train A Maltipoo
 Tricks Border Collies Can Learn
 How To Train A Shar Pei