
The bond between dogs and their owners is a special one, often built on love, trust, and, of course, playtime. Toys play a crucial role in a dog’s life, providing not just entertainment but also mental stimulation, physical exercise, and an outlet for their natural instincts. However, many store-bought toys can be expensive, not to mention packed with synthetic materials that may not be eco-friendly. This is where DIY dog rope toys come into play. Creating your own dog toys can be a fun and rewarding activity that not only saves you money but also allows you to customize toys to suit your dog’s preferences and needs.
In this article, you will learn how to make various DIY dog rope toys, understand the materials and tools required, and discover safety tips to ensure your furry friend plays safely. Let’s dive into this creative and playful journey!
Understanding Dog Rope Toys
What Are Dog Rope Toys?
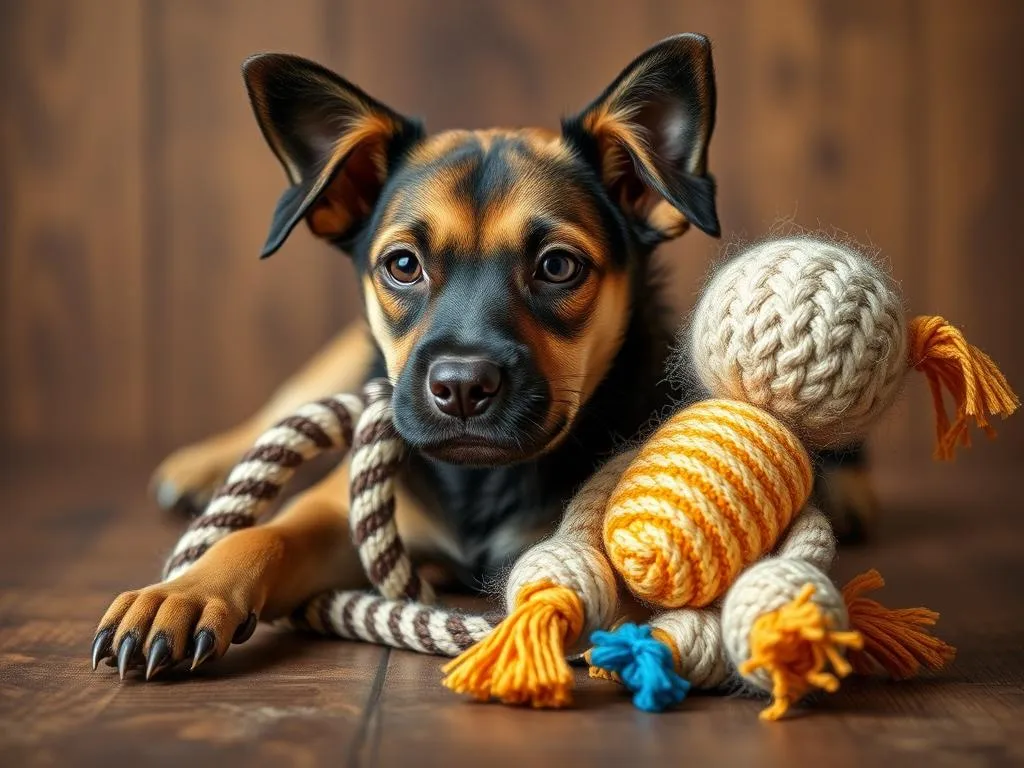
Dog rope toys are simple yet versatile toys made primarily from intertwined or braided ropes. They are designed for chewing, tugging, and fetching, making them ideal for interactive play between dogs and their owners. You can find various types of rope toys on the market, from basic braided designs to more elaborate shapes, including knots and balls.
Benefits of Rope Toys
Rope toys provide numerous benefits for dogs:
-
Mental Stimulation: Engaging with a rope toy can keep your dog mentally stimulated, allowing them to focus their energy on a fun activity.
-
Physical Exercise: Tugging and fetching games help keep your dog active, promoting overall health and fitness.
-
Dental Health: Chewing on rope toys can help reduce plaque buildup, promoting better dental hygiene.
-
Bonding Time: Playing with your dog using rope toys fosters a stronger bond, as it encourages interaction and teamwork.
Materials Needed for DIY Rope Toys
Choosing the Right Materials
When making DIY dog rope toys, selecting the right materials is crucial for safety and durability. Here are some options:
-
Natural Fibers: Look for ropes made from cotton, jute, or hemp. These materials are safe for chewing and don’t contain harmful chemicals.
-
Synthetic Ropes: If you go for synthetic options, ensure they are non-toxic and durable. Avoid ropes with toxic dyes or those that fray easily.
-
Avoid Harmful Materials: Steer clear of ropes with loose fibers, plastic components, or toxic treatments that could pose a choking hazard or lead to health issues.
Tools Required
To create your DIY dog rope toys, you will need some basic tools:
-
Scissors: For cutting the ropes to the desired length.
-
Measuring Tape: To ensure the ropes are cut to the appropriate size.
-
Optional: A sewing kit can be handy for more complex projects that require securing knots or attaching additional features.
Step-by-Step Guide to Making DIY Dog Rope Toys
Simple Braided Rope Toy
Materials:
– Three strands of cotton rope (about 3 feet each)
– Scissors
Instructions:
1. Cut three equal lengths of rope, each about 3 feet long.
2. Tie the three strands together at one end with a tight knot.
3. Braid the three strands together, keeping the tension even.
4. Once you reach the end, tie another tight knot to secure the braid.
5. Trim any excess rope if necessary.
Tips for Variations: You can add color by using dyed cotton rope or incorporate different textures by mixing natural and synthetic fibers.
Tug-of-War Rope Toy
Materials:
– Two thick ropes (about 4 feet each)
– Scissors
Instructions:
1. Take the two ropes and tie them together at one end to form a loop.
2. Braid the two ropes together, leaving enough length for gripping.
3. When you reach the desired length, tie a knot at the end to keep it secure.
Safety Tips: Always supervise your dog during tug-of-war sessions to prevent any accidental injuries. Ensure that the toy is strong enough to withstand your dog’s pulling force.
Knotted Rope Ball
Materials:
– A length of thick cotton rope (about 3 feet)
– Scissors
Instructions:
1. Cut a length of cotton rope, approximately 3 feet long.
2. Create a ball by tightly wrapping the rope into a spherical shape.
3. Once the ball is formed, use the remaining rope to tie knots around it, securing the shape.
4. Trim any excess rope and ensure all knots are tight.
Customization Ideas: Adjust the size of the ball by changing the length of rope used. You can also create multiple smaller balls for a fun game of fetch!
Interactive Puzzle Rope Toy
Materials:
– A length of rope (about 3 feet)
– Squeakers or small toys (optional)
Instructions:
1. Cut a 3-foot length of rope.
2. Create a basic knot in the middle of the rope, forming a loop.
3. If using squeakers or toys, place them inside the loop before securing it with additional knots.
4. Tie off the ends securely to prevent anything from falling out.
Engagement Tips: Use this toy to stimulate your dog’s problem-solving skills. Hide treats inside the knots to encourage them to engage with the toy more actively.
Safety Considerations
Choosing Safe Materials
When crafting DIY dog rope toys, it’s vital to avoid common hazardous materials such as:
- Synthetic fibers that may cause choking or digestive issues if ingested.
- Toxic dyes that can be harmful to your pet.
- Ropes that fray easily, as loose fibers can be ingested.
Always check the durability of the materials you choose and perform regular inspections to ensure your toys are safe for play.
Supervision During Play
Monitoring your dog during playtime with DIY rope toys is essential. Keep an eye out for:
- Signs of wear and tear, such as frayed edges or loose knots.
- Any unusual behavior that may indicate discomfort or choking.
When to Replace Toys
Regularly inspect your dog’s toys, and replace them when you notice:
- Significant fraying or tearing.
- Pieces breaking off that could pose a choking hazard.
- An unpleasant odor or dirt buildup that cannot be cleaned.
Tips for Maintaining DIY Dog Rope Toys
Cleaning and Care
To keep your DIY dog rope toys in top condition, follow these cleaning tips:
- Wash the toys in warm, soapy water to remove dirt and bacteria.
- Rinse thoroughly and allow them to air dry completely before giving them back to your dog.
- Clean toys regularly, ideally once a week, to maintain hygiene.
Repairing Worn Toys
Sometimes, your dog’s favorite toy may need a little TLC. Here are some simple fixes:
- Tie new knots to replace frayed areas.
- Use fabric glue to secure any loose sections.
- If the toy is beyond repair, consider crafting a new one!
Creative Ideas for Customization
Adding Squeakers
For an extra layer of fun, consider incorporating squeakers into your DIY dog rope toys. Simply create a pocket within the toy where you can place the squeaker. This will surprise and engage your dog even more!
Color Customization
You can customize the appearance of your toys using natural dyes or safe fabric. Experiment with different colors to create visually appealing toys that your dog will love.
Themed Toys
Get festive by creating themed toys for special occasions! Consider making holiday-themed toys, such as red and green ropes for Christmas or pastel colors for Easter. This adds a personal touch to your dog’s playtime and makes for great photo opportunities!
Conclusion
Making DIY dog rope toys is not only a creative outlet but also a fantastic way to engage in meaningful play with your furry friend. The benefits of these toys are numerous—offering mental stimulation, physical exercise, and the chance to strengthen your bond. By crafting your own toys, you also have the freedom to customize them according to your dog’s preferences, ensuring they are both safe and enjoyable.
So, gather your materials and get started on your DIY dog rope toys today! Your dog will thank you for the effort, and you’ll enjoy the satisfaction of creating something special just for them.
Related posts:
 Labrador Retriever Puppies For Sale Breeders In Maryland
 Alaskan Malamute Cost
 How Do You Cut An Uncooperative Dogs Nails
 Proviz Explorer Dog Vest Review
 Dog Getting Old
 Off Leash Dog Parks In Christchurch New Zealand
 Top Dog Friendly Beaches In Quebec
 Best Couch Covers For Dogs
 Best Dog Christmas Movies
 What Happened To The Real Balto