When it comes to crafting a collar for your beloved canine companion, opting for a paracord dog collar is a fantastic choice. Not only do these collars provide a durable and functional accessory, but they also allow for a high degree of customization, ensuring that your dog stands out in style. In this guide, you’ll learn everything you need to know about making a paracord dog collar, from understanding paracord to the step-by-step process of creating one.
Understanding Paracord
What is Paracord?
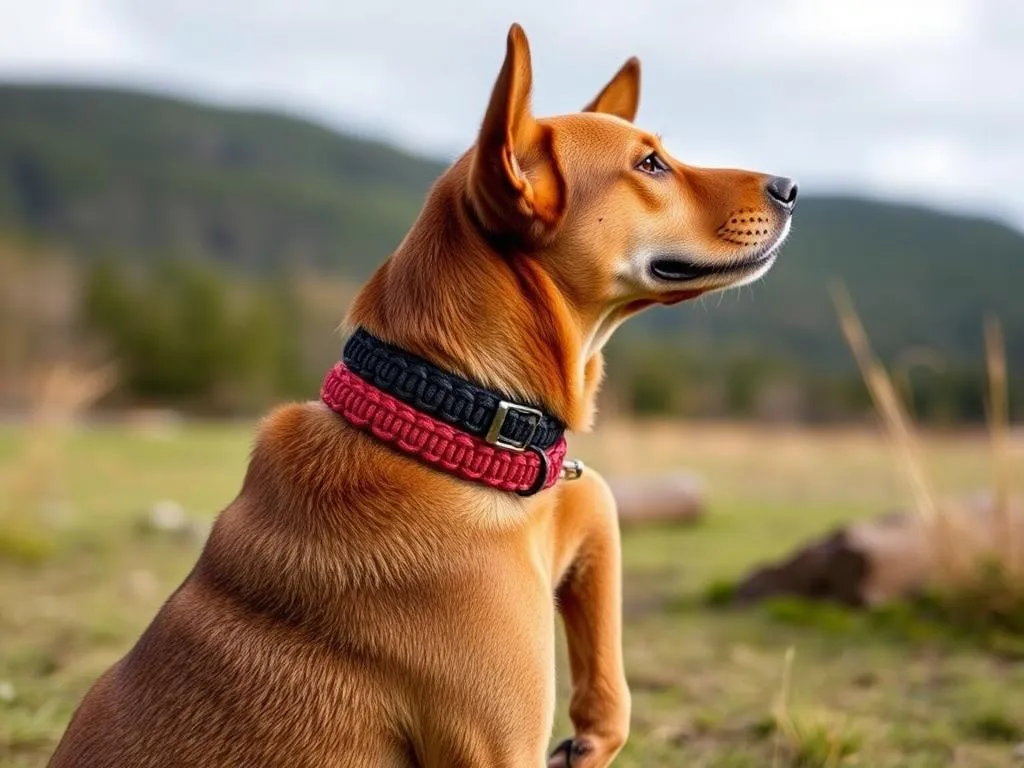
Paracord, short for parachute cord, is a type of strong nylon rope originally used in the suspension lines of parachutes during World War II. Since then, it has gained popularity for various applications due to its incredible strength and versatility. Paracord comes in different types, with Type I, Type II, and Type III being the most commonly used for dog collars. Type III is particularly popular due to its high tensile strength, making it ideal for heavy-duty purposes.
Why Use Paracord for Dog Collars?
There are several compelling reasons to use paracord for your dog’s collar:
-
Durability and Strength: Paracord is significantly stronger than traditional fabric collars. Its high tensile strength means it can withstand pulling and tugging, making it perfect for energetic dogs.
-
Weather Resistance: Unlike standard collars that may retain moisture, paracord is resistant to water and dries quickly, which is especially beneficial for dogs that love splashing around in puddles or swimming.
-
Lightweight and Comfortable: Paracord is lightweight, ensuring that your dog can wear it comfortably without feeling weighed down.
Materials and Tools Required
Essential Materials
To create a paracord dog collar, you will need the following materials:
-
Paracord: Choose a durable type, ideally Type III. You can select from various colors to match your dog’s personality.
-
Buckle: There are different types available, such as side-release buckles or plastic clip buckles. Choose one that suits your design and your dog’s size.
-
D-ring: This is essential for attaching a leash. Ensure it is sturdy enough to hold the weight of your dog.
Tools Needed
You’ll also require a few tools to complete your project:
-
Scissors: A sharp pair of scissors is necessary for cutting the paracord.
-
Lighter or Heat Sealing Tool: This will be used to seal the ends of the paracord to prevent fraying.
-
Measuring Tape: To accurately measure your dog’s neck size for a proper fit.
Measuring Your Dog for a Paracord Collar
How to Measure Your Dog
Before you can start crafting, it’s essential to measure your dog’s neck size accurately. Here’s how:
- Use a measuring tape to measure around the base of your dog’s neck, where the collar will sit.
- Ensure the tape is snug but not too tight; you should be able to fit two fingers between the tape and your dog’s neck.
- Note the measurement and add a couple of inches for adjustability, especially if your dog is still growing or has a thick fur coat.
Choosing the Right Width
Selecting the appropriate width for your paracord dog collar is crucial. Common widths range from 1/2 inch to 1 inch. Generally, larger dogs benefit from wider collars for better support, while smaller dogs may be more comfortable with narrower options.
Step-by-Step Guide to Making a Paracord Dog Collar
Preparing Your Materials
Now that you have everything measured and gathered, it’s time to prepare your materials:
-
Cut the paracord to the desired length. A good rule of thumb is to use approximately 3 feet of paracord for every inch of your dog’s neck size. This allows for knotting and adjustments.
-
Prepare the buckle and D-ring by attaching the D-ring to one end of the buckle to ensure it’s ready for assembly.
Basic Knot Techniques
Before diving into assembly, familiarize yourself with some essential knot techniques:
-
Cobra Knot: This is the most common knot used in paracord dog collars. It’s strong and provides a beautiful finish.
-
Square Knot: A simple knot that can be used for securing the collar in place at the end.
For visual learners, consider watching video tutorials that demonstrate these knots to ensure you’re comfortable with the techniques.
Assembling the Collar
With your materials prepared and knots learned, it’s time to assemble the collar:
-
Start by folding the paracord in half and threading it through the D-ring before attaching it to the buckle.
-
Use the cobra knot to create a series of knots along the length of the paracord. Make sure to pull each knot tightly to ensure strength and durability.
-
Continue knotting until you reach the desired length. Remember to leave enough paracord at the end to attach the second side of the buckle.
Finishing Touches
Once you’ve completed the knots, it’s time to finish:
-
Cut any excess paracord, leaving a small length for sealing.
-
Use your lighter or heat sealing tool to carefully melt the ends of the paracord. This prevents fraying and adds a polished look to your collar.
-
If you want to add some flair, consider incorporating beads or color patterns into your design. This can be done during the knotting process for a unique touch.
Customizing Your Paracord Dog Collar
Color and Pattern Options
The beauty of making a paracord dog collar is the endless customization options. Here are some ideas:
-
Color Combinations: Mix and match different colors of paracord to create a unique look. You can choose complementary colors or go for a vibrant contrast.
-
Patterns: Experiment with different knotting techniques to create patterns. You could alternate colors or incorporate braids for added visual interest.
Adding Personal Touches
To personalize your collar even further, consider:
-
Adding Name Tags: You can attach a small tag with your dog’s name and your contact information to the D-ring.
-
Incorporating Charms: Small charms can be threaded onto the paracord or attached to the D-ring for additional personality.
Care and Maintenance of Paracord Dog Collars
Cleaning Instructions
To keep your paracord dog collar looking its best, follow these cleaning instructions:
-
Washing: Hand wash the collar in warm, soapy water. Avoid using harsh chemicals that could damage the material.
-
Drying: Air dry the collar completely before using it again. Avoid direct sunlight, as prolonged exposure can fade the colors.
Inspecting for Damage
Regularly inspect the collar for signs of wear and tear. Look for:
-
Fraying Ends: If the ends show signs of fraying, it may be time to melt or cut them back.
-
Knot Stability: Ensure that all knots remain tight and secure. If they loosen, re-tie them to maintain safety.
Conclusion
Creating a paracord dog collar is not only a rewarding project but also a functional accessory that you and your pet can enjoy. With the benefits of durability, customization, and ease of maintenance, making your own collar is a great way to express your dog’s unique personality. Whether you’re crafting for your own pet or creating gifts for friends and family, this guide provides all the information you need to start your journey into paracord crafting. Happy collar-making!